
Faux Effects, Distressed
Wood Surfaces
Creating distressed wood surfaces that look authentic is an art form requiring patience and the flexibility to experiment with a wide range of finishing materials.
by Ester Brody
and collectibles would agree that there’s something very special about the way wood ages. Whether it’s the sun bleached look of a dark-stained oak door or cabinets that have earned their character with worn edges, scattered dents and darkened knobs — aged wood has a charm and presence that continues to be a popular decorating style. Other that collecting and restoring true antiques, it is possible to capture the look of distressed wood surfaces through craftsmanship and science.
 |
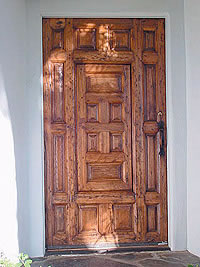 |
| top: before & bottom: after distressing |
|
 |
Creating distressed wood surfaces that look authentic is an art form requiring patience and the flexibility to experiment with a wide range of finishing materials. Many professionals have learned their trade from older, experienced master craftsmen, painters and cabinetmakers who specialize in these types of finishes. “I was very fortunate to learn this craft from an older gentleman who allowed me to apprentice with him years ago, ” says Bob Levy, whose company Bob Levy Decorative Finishing is in Aspen, Colorado. “Through my early experiences, I was able to perfect some techniques that just aren’t widely known in today’s painting and decorating industry.” Even in his own business, Levy says that not all of his painters are experts in creating every type of finish. Rather, different individuals specialize in different types and styles of distressing wood surfaces. Since the work is artistic, a lot depends on the job and what is required. “Some painters are just better at work that requires a subtle touch, while others excel at bolder, more dramatic looks,” notes Levy.
Victor DeLor, a decorative artist in Los Angeles, learned his craft while he worked in the movie industry as a set painter. According to DeLor, movie studios hired the very best artisans from Europe to create realistic backdrops and props. “Everything we created needed to look authentic to add to the character of the film,” says DeLor. Today, DeLor does interior and exterior specialty jobs for the many estates in the Los Angeles suburbs. Artist Joanne Day runs Day Studio Workshops Inc. in San Francisco where decorative artists and painters come to learn a wide range of skills including distressing wood.“The distressing process is a very interesting specialty,” explains Day. She says that distressing involves the physical and visual. For example, a surface that has been scuffed and dented has a three dimensional look and feel. But, a smooth “undamaged” surface can also have a timeworn look. Day says that both the physical and visual can be used together or separately.
One of the best ways to replicate a distressed finish is to work from a model. This model may actually be a true antique or a well-done reproduction. Customers may also bring you pictures from various shelter magazines that showcase the latest trends. In either case, being able to reference an example of what you are trying to achieve is a helpful step. The distressing process itself is as varied as the finishes that can be achieved. Ultimately, the finish you are trying to capture will depend on the type of wood you are working with, its condition, and the customer’s taste.
To create a surface that looks like it has been through many years of wear and tear, craftsmen usually mar the surface with any number of tools. Some use heavy chains, a ring of keys, ice picks, drill bits and the like. Professionals often create their own tools based on a specific look they are trying to obtain. “I’ve experimented with all kinds of hardware to come up with different effects,” says DeLor. He adds that some tools may be nothing more than a combination of nuts and bolts wired together. A favorite distressing tool used by Day consists of a rubber mallet that has 20 to 30 nail heads of varying shapes and sizes driven into it. Since the nails are bent over each other in random configurations, Day says she is able to get irregular patterns with this tool. “The key when distressing is to create natural, subtle effects that have different angles and depth,” Day says. In addition, experts agree that when distressing, less is more: they warn against over-distressing a surface. “Work to create a well-worn look, not a surface that looks abused,” advises Levy.
Enhancing surface nicks and pinholes is another part of the distressing process. Some painters apply a dirty brown wash of a very thin latex paint or even strong cold tea or coffee to highlight marks. Dark powdered pigment can also be rubbed into the surface to imitate years of dirt build up. Using a blowtorch to gently scorch edges of cabinets or doors can create additional aging.
natural-looking wear include “easing the edge” or scuff-sanding edges that come into constant hand contact or darkening areas around knobs where natural oils from daily handling would leave their mark. These techniques are followed by sanding to remove excess debris before sealing, staining and applying finishing coats.
Distressed wood can also take on the look of a surface that has been painted many times over the years. Authentic distressed painted wood pieces show their age by exposing older coats of paint beneath worn areas that reveal previous colors. In his book called Fake Your Own Antiques, Peter Knott provides an easy way to achieve this look. The first step is to apply a latex paint to a properly prepared surface. When the base coat is dry, apply a sparing amount of Vaseline to areas prone to high wear. (The Vaseline will keep the new layers of paint from adhering to the original painted surface.) Next, brush on two to three coats of contrasting latex paint, allowing each coat to dry between applications. When the surface is completely dry, rub down the surface with medium grade steel wool. The rubbing action will expose the “old” paint giving the surface a timeworn look. Finnish off this treatment by applying a diluted honey-colored latex paint over the whole surface to give it the look of aged varnish. Apply a final coat of varnish when the surface is dry.
Another way to achieve similar effects is to dip a crumpled piece of sandpaper into a contrasting color of paint and dab or drag it along surface areas that would typically show wear. After the “accent color” is dry, sand it, and finish with varnish.
Artists, decorators and collectors of antiques easily recognize the unique qualities of wood that was finished in the classic style of a selected period. Many of these techniques can be replicated, but are unpredictable and require a high level of expertise. In addition, many of these methods are extremely time-consuming and labor-intensive. Two well-known books, Classic Wood Finishing by George Frank and Classic Finishing Techniques by Sam Allen, provide excellent step-by-step instruction on how to achieve these wonderful old-world finishes. Some of the methods highlighted include French polish, varnish, oil, wax, natural and chemical stains, fumed finishes and milk paint.
Fine finishes can also be achieved by using the high quality updated materials available through any paint retailer. These products are easier to work with and provide stronger, more resistant finishes that those mentioned earlier. DeLor uses a process that creates a furniture quality finish that is both beautiful and durable. Once a surface has been distressed and sanded, DeLor applies sealer to assure an even tone and to help bring out the grain of the wood. Staining is the next step. DeLor sprays the stain, then wipes off excess in selected areas to show contrast and highlights. Several coats of a lacquer sanding sealer are sprayed-on next. This step is important to the quality of the final finish since it provides a seal for porous wood surfaces, protects it, and establishes a film build. To create surfaces that look like fine furnishings, DeLor applies a dye and lacquer combination. Each dye and lacquer mixture is specially made for the job according to customer and decorator specifications. The final step is spraying on a lacquer in a semi-gloss or eggshell finish. Another dimension can be added to the surface by applying a thin coat of fine quality wax.
Glazing and adding patina are other finishing styles that provide surface depth and interest. Glazing, a product that combines varnish, paint and solvent gives a translucent look when applied over a lighter base color. A patina, made of the same ingredients as a glaze, except with a much higher amount of varnish, offers only a hint of color when applied over a contrasting base. In her work with these finishes, Day has added to the dramatic look of these surfaces by applying four to five coats of clear varnish followed by wet sanding after the surface has had two to three days to dry. The wet sanding produces a glass-like finish that gets rid of imperfections and brush marks. Intensive polishing with the same products used in auto shops comes next. Day uses PPG Ditzler DRX-25 Polishing Compound applied with a soft rag. When the wax is dried and buffed, she creates a high-gloss sheen with Meguiar’s Mirror Glaze #20 Professional Polymer Sealant.
 Well-done distressing technique comes from years of practice and experimenting. Like many artisans in this field, Levy has developed his own methods and products to create fine furniture-quality finishes. According to Levy, it’s the meticulous attention to detail that make a surface distinctive. For example, Levy may add water spotted areas to give character, or enhance receded or raised areas with pure pigments that are “dirty” brushed into the surface. Levy says that like any work of art, fine wood finishing requires many stages before the final look emerges. Well-done distressing technique comes from years of practice and experimenting. Like many artisans in this field, Levy has developed his own methods and products to create fine furniture-quality finishes. According to Levy, it’s the meticulous attention to detail that make a surface distinctive. For example, Levy may add water spotted areas to give character, or enhance receded or raised areas with pure pigments that are “dirty” brushed into the surface. Levy says that like any work of art, fine wood finishing requires many stages before the final look emerges.
With any of these finishing techniques, whether you are trying to replicate original finishes or work with newer products, safety should be at the forefront. Many of these methods use products that are highly toxic and flammable; gloves, protective eyewear, and proper ventilation are standard safety requirements. Manufacturers will also provide guidelines on how to ensure the safe use of their products. “This type of work requires a level of professionalism on all parts of the job, from beginning to end,” Levy concludes.

|


