|
...continued from previous page
Refinishing Bathroom
Sinks & Tubs
If you like working with coatings, but want to enjoy a bigger profit margin and less competition, consider offering a refinishing service for bathtubs.
by Susan Brimo-Cox
There isn’t much you need in the way of specialized tools for refinishing work: scrapers and a utility knife to remove caulk; sponges and paper towels for cleaning; and masking paper, plastic sheeting and tarps for masking off the work area and protecting floors, walls and cabinets.
There are, however, two things you should be willing to spend money on. The first is spray equipment. You won’t be brushing, rolling or using an airless sprayer to apply the coatings. Only a high-volume, low-pressure (HVLP) sprayer will do. The second necessity is safety equipment, including exhaust fans and breathing protection. As Richard Schlenk, president of Contemporary Contractors Inc. in Grand Prairie, Texas, emphasizes, “A fresh air supply is needed, as well as good respirator masks.”
Materials for refinishing have changed dramatically over the years. Instead of epoxies, acrylic polymers and acrylic urethanes are the most common products used today, often as part of proprietary systems that include cleaners, a bonding agent and primer. Levens points out that urethanes are more chemical resistant. On the other hand, Pistor observes, acrylic polymers are isocyanate-free.
Depending on the system used and the surface being refinished, the exact steps may vary slightly, but essentially the process of refinishing includes masking all the areas not being refinished; removing the caulk; sanding and thoroughly cleaning the tub; applying a bonding agent; applying primer; and then finishing with the top coat. Remember, every job should be well ventilated to the outside.
“The key to good refinishing is [knowing] how to bond the new finish to the old one,” Pistor says. Top-notch preparation is essential.
Levens reports that some contractors use hydrofluoric acid cleaners. Others use industrial cleaners.
The number of coats of primer and top coat varies, depending on the product used. Usually they dry to the touch within minutes, but cure time can range from four hours to 24 hours or so.
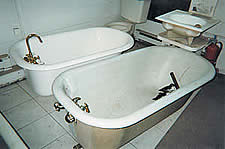
Annis applies two coats of primer and three coats of top coat to a bathtub. While the bathtub refinishing process may take only four hours (versus one to two hours for a bathroom sink, or two to three hours for a kitchen sink), Annis says, “I generally return after several hours or the next day to inspect and touch up as needed, remove masking and reapply any hardware removed prior to refinishing.”
The care and maintenance of a refinished tub is “very similar to a new tub — no abrasives or harsh chemicals,” Pistor says, A refinished surface is good and hard, “but not bulletproof.”
 “When properly done, a refinished tub and tile should last, at least, five years,” Anderson says. “When properly done, a refinished tub and tile should last, at least, five years,” Anderson says.
Others have seen a refinished tub last for 10, 15 and 20 years. “After 15 years you’ll start to lose the luster, the gloss,” Levens explains. But the finish should not peel or crack.
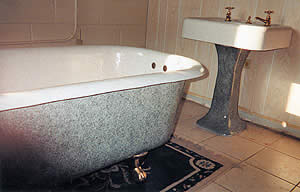
Right now, virtually any solid color is available for the top coat. Anderson observes that multi-colored flecked finishes are very popular today. Some of these finishes achieve a speckled or stone-like appearance. Levens likens some to granite.
“These decorative finishes seem to be an area where the most changes are coming,” Pistor says.
Every refinishing contractor I spoke with recommended some sort of training.
You need to learn “what to do, why to do it and what materials to use,” Pistor says. Surface preparation is different for porcelain, fiberglass, cultured marble and Formica, he adds. That’s why a critical part of learning is hands-on experience. “That would be an important aspect to look at in a training program.”
A two- to three-day training class can run about $500. But don’t expect to be an immediate expert.
“It takes time and practice to really get to be a professional,” Horton explains. “You’re not going to learn everything you need to know in three days. It took me at least a year to get real comfortable at refinishing.”
Annis launched his new service a little more than a year ago. “Starting in renovated crack houses and the worst student housing, through apartment complex renovations mixed with all kinds of residential and rental houses, and now adding upper-scale residences and motel/hotel industry, I have seen a wide variety of situations. Certainly, the journey is just beginning.”

|